Руководство по редактированию вики
Правила редактирования вики
Несоблюдение данных правил скорее всего приведет к блокировке вашего аккаунта на всех ss220 вики, поэтому постарайтесь их не нарушать. Помните - это не буквально 1984, а лишь необходимые меры, дабы вики была читаема обычными игроками, а редакторы вики могли легко и просто заниматься самим редактированием вики.
Политика по переводу
- Перевод (в отличие от редактирования) должен соответствовать по содержанию оригинальной странице сборки Paradise, Sierra, TG, TGMC или [1] за исключением случаев, когда информация с оригинальной страницы не соответствует реалиям текущей сборки, например при разнице обновлений.
- Адаптированный перевод, т.е. добавление собственного текста, допускается на страницах-руководствах. Для иных страниц требуется оповещение главного редактора (
BOTpurple#7181в дискорде). - При переводе должны использоваться общепринятые расшифровки и аббревиатуры, отличающиеся от билда к билду. Если при переводе вам встретилась аббревиатура, которая отсутствует на данной странице (для Paradise, для TG, для TGMC, [2] то сообщите об этом в дискорд-канал
#wiki-mistakes. - Рофлоперевод, а также машинный перевод, т.е. прогонка текста через онлайн переводчик без последующего исправления, запрещены и презираются даже на незаконченных страницах. Не считайте это запретом на использование переводчиков - но при их использовании исправьте текст на такой, что бы он был читаем и не выглядел слишком машинно.
- Именные вставки, т.е. выделение определённого человека в тексте по различным причинам, запрещено на любых страницах и руководствах вики, за исключением Песни, Образцы документов и подобных страниц на других вики.
- Излишнее использование зачёркиваний, жирного текста, увеличенного текста, курсива и т.д. не приветствуется, если соответствующего нет на оригинальной странице.
Политика по редактированию
- Описание изменений должны содержать в себе компактную, но подробную информацию о редактировании.
- В случае внесения малого вклада на страницу, также требуется заполнение описания изменений.
- Переименовывание страниц вики запрещено, кроме случаев, когда название не переведено или кардинально отличается от содержания страницы. В основном потому что это наверняка сломает ссылки и перенаправления (в том числе двойные перенаправления) на страницу.
Редактирование
Предупреждение: данный гайд в основном рассказывает о редактировании с использованием редактора текста. Для визуального редактора - смотрите тут
Вики Skyrat-а, как и любая другая вики SS220 постоянно переписывается и улучшается - обычными игроками. Поэтому и для таких-же обычных игроков создана эта страница - в ней вы сможете узнать базовые знания о редактировании вики и организации информации в целом, дабы быть готовыми исправить, перевести или улучшить какую-то из страниц.
Множество полезной информации можно найти тут, равно как и список страниц, что требуют переписи, перевода и т.д. Поэтому, если вы захотите найти определенный шаблон, категорию или попросту найти страницу, где что нужна перепись, перевод или схожее - Портал Сообщества вам в этом поможет.
Если захотите найти для себя задачу - Категория:Требуется перевод и Категория:Needs Revision всегда помогут вам в этом. Если же вы заметили страницу, которым такой шаблон требуется, но его там нет - не стесняйтесь его добавить (не забывайте добавить причину, если это предусмотрено шаблоном)
Получение доступа к редактированию
Обычный человек может редактировать большую часть страниц - но некоторые страницы защищены.
General Wiki Standard
To keep things looking consistent on the wiki we have an established standard for most if not all things. These are just small simple things such as naming conventions or where and how to use capitalization or emboldening of text. These are sort of pseudo rules but they do not always have to be followed if it helps with the page you are working on.
Some basic things that fall under the standard to keep things looking consistent are:
- Media (Things such as files, .png's .gif's, etc) Should either be uploaded in 64x64 or 32x32 (64x64 being preferred, exceptions are made for sprites larger than this of course)
- Secondly when you upload a file please include some key words in the summary box on the upload page. This will help the wiki's search functions locate the file easier. See: Uploading files For more details on how to upload files.
- Names for files and other media should always be to the point, short and descriptive of the Icon or image. (So if you're uploading an image of a wrench call it wrench.png and not tool.png)
- Do not use excessive emboldening of text in articles. Keep it isolated to stuff like headers or text that is of high importance. Avoid using it in the middle of a paragraph as much as you can.
- Small jokes and humorous bits of strike-through text on pages are fine but it should stay contained to that. Do not make entire joke pages as this is a violation of the Wiki Rules
- The first letter of a page name should always have capitalization applied to it.
- Try to keep articles and pages to the point and on topic. User pages and talk pages may be used to how you see fit.
- Try to avoid uploading duplicate images where possible and if you find a duplicate Slate it for removal please.
Basic Editing
This section of the guide to wiki contribution will cover some of the basics. Things such as creating new pages, editing existing pages and articles along with uploading files.
Creating new pages
A quick and easy explanation on how to create new pages. For making stuff such as guides or whatever your project is!
Alright, you need to create a page for a personal project, a guide to write or do whatever with. To do this follow the quick and easy steps listed below!
- Step 1: Type the name of the page you want to create into the search bar on the top right and hit enter.
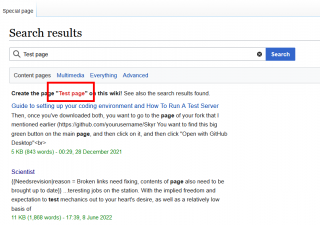
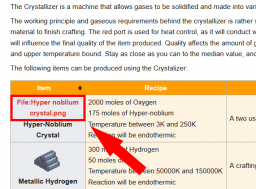
- Step 2: You will now see the results of your search. Depending on what you typed into the search bar you might get some results from different pages that have words that match your search but that is not important. To create the page click on the red bit of text. (See Figure 1)
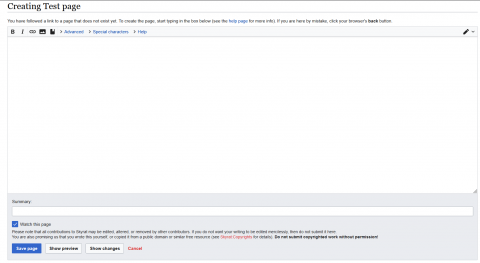
- Step 3: After you clicked on the red bit of text it will have re-directed you to an empty page with the name you typed into the search bar. In here you are free to create, type or put whatever and use it how you see fit.
- Step 4: Saving your changes is done by pressing the blue save page button at the bottom of the text editor. If you want to detail some of the changes you have done or what kind of page you have created you can give a short little summary in the text box beneath Summary: in the editor. Anything you put in there will be shown in the change log.
Miscellaneous Notes:
- Try and keep your page names short and to the point and do not make them overly long. (This will only result in a mess when you try to link or display the name of a page with a really long name)
- Always capitalize the first letter of a page name.
Editing a page
A detailed explanation on how to edit pages with the two different editors.
Disclaimer: This section will mostly cover the Source editor (Text editor) For help with the visual editor see: Mediawiki's guide
So you need to edit a page for some reason? It might be out of date, you might have found a spelling error or other incorrect information. Whatever it is that warrants the need for a change this quick step by step guide will help in getting your footing with editing a page on the wiki.
- Step 1: Navigate to the page you want to edit and click Edit source or Edit (See Figure 2)
(Clicking Edit source will bring up the text editor while Edit brings up the visual editor)
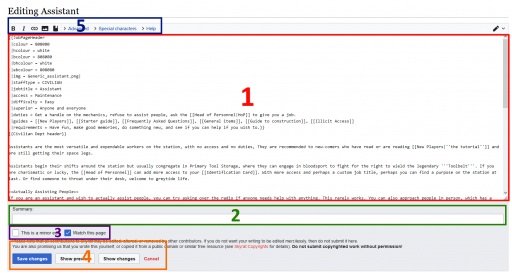
- Step 2 (Edit - Source/Text editor): You will now have the text editor open and be confronted with a window that looks like the following: (See Figure 3)
- Step 2.1: Editor explanation (Source/text editor): See figure 3 and the text explanation below here.
(1) In the middle of the screen and highlighted with red (1) is a large text box. This is the actual contents of the page (In text form), anything changed or added there will show up when the page is edited.
(2) Beneath that, and highlighted with green (2) is the summary box. This small text box can be used to describe any changes you made. When you save your edit and you described your changes in the summary box, that small summary will be shown in the change log in: Recent changes as well as the change log of the actual page itself. The button to view the change log of any page is located right next to the Edit and Edit Source buttons on the top right side of any page.
(3) Underneath the Summary box you can find two little buttons highlighted with purple (3). You can either tick or un-tick these and nothing else. Ticking the This is a minor edit box will mark the edit you made as minor. You can do this if the changes you made did not affect the contents of the page too much or if it was a simple small edit. (Edits smaller than 500 bytes will automatically be marked as minor) The button next to that will simply decide if the page will be added to your Watchlist when you save the edit.
(4) Highlighted with Orange (4) and at the bottom of the editor four buttons can be found. All of which will be explained in their listed order:
- Save changes: Simply saves the edits and changes you made to the page, updating it to the newly revised version you made.
- Show preview: Will show you a preview of the edit you are currently working on. Remove some words from (1) and add a few in another and hitting show preview afterward will show you the changes you made in the normal way the page is always displayed.
- Show changes: Shows a comparison and differences between the last revision of the page and the current edit you are working on. This difference is shown in a simple text format with things that have been removed highlighted in yellow, and new additions shown with blue.
- Cancel: Simply cancels your edit and closes the Editor.
(5) And lastly at the very top of the editor, highlighted with blue (5) is a helpful hot bar. This hot bar has buttons for: Adding bold text, Italic text, images, links and a whole lot more advanced and special functions listed underneath the drop-down menus for Advanced and Special characters. If you ever feel lost or forgot how to do something basic like linking to stuff on the wiki the drop-down menu underneath Help provides some great explanation to some of the more basic functions of the wiki.
- Step 2 (Edit - Visual editor): After clicking Edit you will be re-directed to the visual editor. The visual editor is an amazing and a very powerful tool. Its main strength comes from the fact that you can preview your edit as you're working on it. Given its nature is that you edit the text as its shown on the page, instead of working within a text-box like the source editor has.
- Step 2.1: Editor explanation (Visual editor): Mediawiki does a much better job at explaining the visual editor than I ever could so for a guide and explanation to it see: Help:VisualEditor/User guide
Miscellaneous Notes:
- Try to always use the Summary window or describe your changes to the bare minimum using it please.
Uploading files
Where and how to upload images and other files onto the wiki in a quick and easy guide.
At some point on some random page an image or other file will become outdated and need replacing. Usually these files are flagged with the needs revision tag and can be found in that respective category. A full list of all files on the wiki can be found under the file list This short guide will teach you how to upload files and some good etiquette when it comes to files on the wiki.
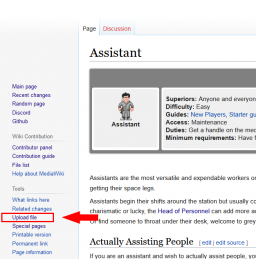
To upload a file onto the wiki simply click on Upload file in the sidebar (See Figure 4).
Alternatively you upload files through broken file links by simply clicking on them and submitting the right file. To see a broken file link see Figure 5
When you have followed either of the following methods you will find yourself on the upload file page. Here you can select a file from your computer, give it a name (Unless it already has one defined), Add a small summary describing the file or just adding key words into the summary and lastly upload it.
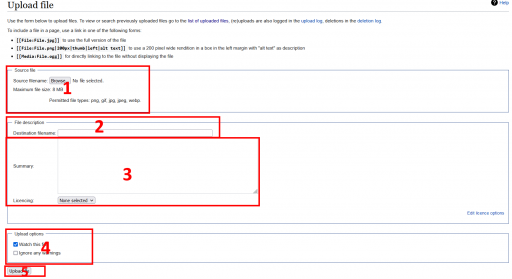
(1) You select the file from your computer here.
A file may have a maximum size of 8 MB and only the following file types are accepted: png, gif, jpg, jpeg, webp.
(It is good practice to upload files or icons from the game in 64x64 and as a .png, given these Icons are not animated or larger than 64x64)
(2) Is a simple textbox that will determine the name of the file once its uploaded.
Try to keep this as simple and short as possible. Capitalize the first letter of the name (applies if the file name has multiple words or one) and keep the name relevant to the file. Aka, Don't use complex names or random numbers and letters, this will only make finding said file a complete nightmare.
(3) Has both the Summary box and the licensing options, the latter of which is not that important. When you upload a file please enter either the name of the file or some keywords that relate to the file into the summary. Doing this will help immensely with having the search functions on the wiki actually find the file when searched for. For example: Media:Herb seeds.png has the following key words in the summary: Herb seeds. As said previously the licensing options are not important and can be ignored.
(4) These are the Upload options, they are two simple tick boxes the first of which will determine if the file will end up on your watchlist or not. The second will when ticked, ignore any warnings that could come from uploading a file. Warnings can be stuff like duplicate warnings so its generally good to leave this un-ticked.
(5) All the way the bottom you can find the upload button. When you have everything set you can hit this and your file will be uploaded onto the wiki!
Miscellaneous Notes:
- As said before, files should be uploaded in 64x64 if they're icons from the game (Stuff like items, machines, etc)
- Gifs and images should always be relevant to either the game or the point that you are trying to make on the page. If having some media on a page helps getting your point across feel free to use it!
- Uploading memes, your OC or any other form of non-relevant media will get your wiki account blocked and said media deleted.
- When you upload a new version of an image or any other piece of media it will take a while for the cache to update the change. So dont panic when you see the old Icon listed twice after you uploaded a new one.
Basic Wiki Syntax
The syntax available to wiki contributors is not usually well presented so a repository of tutorials and information is needed here. This provides the most basic tools a wiki contributor will need in order to fully edit the wiki. 99% of the time, the average wiki contributor will not need more than this (in addition to templates later).
Text Formatting
Text by itself is extremely boring and often hard to read, so you can use text formatting to make your words really POP!
| Format Type | Usage | Output |
|---|---|---|
| Bold | Use this to bring attention to important text '''This text is bold''' |
This text is bold! |
| Italic | Use this to enounciate certain words ''This text is italicized!'' |
This text is italicized! |
| Headings | Use this to declare a section of your article and organize it
==Level 2== ===Level 3=== ====Level 4==== =====Level 5===== ======Level 6 ====== |
Level 2 Level 3 Level 4 Level 5 Level 6 |
| Paragraphs | You can designate sections of text as paragraphs which will for a linebreak before and after that section, you can also apply some more advanced formatting through Styles with it. <p> This is a paragraph of text! </p> |
This is a paragraph of text! |
| Bullet Lists | This is how you create bullet lists
*Item 1 * Item 2 ** Item 2.1 ** Item 2.2 * Item 3 ** Item 3.1 *:- Definition |
|
| Numbered Lists | This is how you create numbered lists
#Item 1 # Item 2 ## Item 2.1 ## Item 2.2 # Item 3 ## Item 3.1 |
|
| Preformatted Text | Use this to preformat text with a certain, this will alos allow you to write anything within the pre blocks without the wiki recognizing it as text formatting.
<pre>This text is preformatted to be the default font and style, <b>Things aren't bolded</b> or <i>Italicized</i>!!!</pre> |
This text is preformatted to be the default font and style, <b>Things aren't bolded</b> or <i>Italicized</i>!!! |
| Comments | Use this to leave important notes/messages to people editing the page. Comments do not show up when you view the wiki page and are only visible in the page editor.
<!--This is a comment, to whoever is reading this --> The Fitness Gram Pacer Test is a multi-stage aerobic exercise... |
The Fitness Gram Pacer Test is a multi-stage aerobic exercise... |
| Nowiki | The nowiki block makes it so that any formatting within the block is ignore and is instead displayed as regular text. <nowiki><b>This is bold!<b> this is a burger: [[File:Burger.png]]</nowiki> |
<b>This is bold!<b> this is a burger: [[File:Burger.png]] |
References
It is very important the articles link to each other so we have a web of information. In order to do this, we can reference articles and link keywords to those articles.
The most obvious way to do this is by typing [[Article Name]]
For example, you could link to the Guide to food by typing[[Guide to food]]You can also link the article and change the link text. If you wanted to still link to the guide to food but instead have the link be Cooking then you would have to use the syntax below. The two parameters for images is the Page Name and the Link Text --> [[Page Name|Link Text]]
[[Guide to food|Cooking]]
Referencing Nuances
As a general note, you should always add spaces after references as it will include any characters that are next to it. So if you write [[Guide to food]]textextext It will output as Guide to foodtextextext.
If you wanted to do something like SMES's where you have characters directly next to the link then you would have to add the <nowiki /> tag to it --> [[SMES]]<nowiki />'s
If you want to link to an image rather than embedding it you will need to add a ':' colon before the name. For example, I can reference File:Burger.png without the image embedding itself by doing:[[:File:Burger.png]]
If you want to link to something outside of the Main: Namespace (if you're not sure what a namespace is, go here, but for now all you need to know is that all general users will be reading are in the Main Namespace) you will have to specify which namespace the article is in before you link it.
For example if I wanted to link to my user page:User:Quacks I cannot just use [[Quacks]] because it will automatically default to the main namespace -> [[Main:Quacks]] which does not exist. I will have to instead specify which name space I'm searching in. For the user's name space I will specify User[[User:Quacks]]
Referencing Subsections
Sometimes you don't want to just link to an article, you want to link to a specific point in that article.
By adding a hashtag '#' to the end of a page name in your link you can specify where you want to go in that article. You can do this for any subsection in an article.
If I wanted to link this to burgers on the guide to food. All I would have to do is specify it like so:[[Guide to food#Burgers]]If the area you're referencing is in the article where the link is you can shorten the syntax. For example if I was on the Guide to food page and I wanted to link a certain word to a subsection/anchor all I would have to do is use a '#' and write the subsection name:
[[#Burgers]]
Anchors
An Anchor is a defined place within in a page that you can link people to. They work much like headings where you can link people to them:[[Page Name#Anchor Name]].Infact, all headings have anchors attached to them! On our wiki we have Template:Anchor which allows us to create anchors extremely easily. What you will need to do is find the area you want someone to be taken to and place the anchor directly next to it via
{{Anchor|Anchor_Name}}
If I wanted to create an anchor right -> here <- all I would have to do is this: If I wanted to create an anchor right -> here{{Anchor|AnchorExampleSpot}} <-
now if you click on #AnchorExampleSpot it should take you directly to the anchor.
External References
Occasionally you will need to reference a link outside of the Wiki. This is often seen in articles that are guides to spritiing/code stuff or in our rule pages. Bottom line, you will rarely ever have to use an external reference and it should be avoided. If you ever do need to add an external link, it is a lot like referencing an internal article.
You will needs to use one opening square bracket '''[''' and one closing square bracket ''']''' Inbetween you will need to put the link, add a space after the link and define the text for the link
[https://github.com/Skyrat-SS13/Skyrat-tg Github]
This outputs: Github
Images
Images are extremely important for the wiki, without them people wouldn't know what icons/mobs would look like or get a visual representation of what they're supposed to do.
In order to use an image you must utilize the [[File:]] synax.
For example, if you want to use Burger.png: ![]() then you must specify [[File:Burger.png]]. This will make Burger.png appear wherever you declare this.
then you must specify [[File:Burger.png]]. This will make Burger.png appear wherever you declare this.
However, in order to make images useful to us, we need to format that in a way that is easy to understand and see. We can add parameters to our image by utilizing the pipe '|' character. If you want your image to a certain size and make it link to another page you can specify it as [[File:Burger.png|64px|link=Space Law]]. There's a ton of parameters you can use but the most important ones are listed below.
Tables
Put data and other info into tables cause it helps readers digest information more betterer
A wikitable always has to be wrapped by curly brackets and a pipe bracket
{|
All the content goes here
|}
Below from left to right is Table Syntax, an example table in final form, and example code for a table.
| Syntax | What it does |
|---|---|
| {| | Start a table - required |
| |} | End a table - required |
| |+ | Add a definition/title to the table |
| |- | Starts a new row |
| ! | Creates a Header Cell |
| | | creates a new cell |
| Header Cell | Header Cell | Header Cell |
|---|---|---|
| Header Cell | Cell | Cell |
| Header Cell | Cell | Cell |
| Header Cell | Cell | Cell |
| Header Cell | Cell | Cell |
| Header Cell | Cell | Cell |
| Header Cell | Cell | Cell |
{|class="wikitable"
|-
! Header Cell
! Header Cell
! Header Cell
|-
! Header Cell
| Cell
| Cell
|}
Table Classes
You should never go with the default table setup because it has no border or lines to break up cells. In order to give our tables fancy UI we have to declare what class it is.
We always do this at the beginning directly after the table start syntax The wikitable class gives our tables borders/outlines with grey backgrounds for header cells
| Header Cell | Header Cell | Header Cell |
|---|---|---|
| Header Cell | Cell | Cell |
{|class="wikitable"
|-
! Header Cell
! Header Cell
! Header Cell
|-
! Header Cell
| Cell
| Cell
|}
The mw-collapsible class makes it so you can collapse the table(have to include wikitable class)
| Header Cell | Header Cell | Header Cell |
|---|---|---|
| Header Cell | Cell | Cell |
{|class="wikitable mw-collapsible"
|-
! Header Cell
! Header Cell
! Header Cell
|-
! Header Cell
| Cell
| Cell
|}
The mw-collapsed starts a table with a mw-collapsible class in the collapsed state.
| Header Cell | Header Cell | Header Cell |
|---|---|---|
| Header Cell | Cell | Cell |
{|class="wikitable mw-collapsible mw-collapsed"
|-
! Header Cell
! Header Cell
! Header Cell
|-
! Header Cell
| Cell
| Cell
|}
The Sortable class allows you to make your columns sortable alphabetically, numerically, or by date. Additionally, by defining a row with class="unsortable" you can make it so that row isn't sortable.
| Alphabetic | Numeric | Date | Unsortable |
|---|---|---|---|
| d | 20 | 2008-11-24 | This |
| b | 8 | 2004-03-01 | column |
| a | 6 | 1979-07-23 | cannot |
| c | 4.2 | 1492-12-08 | be |
| e | 0 | 1601-08-13 | sorted. |
{| class="wikitable sortable"
|-
! Alphabetic
! Numeric
! Date
! class="unsortable" | Unsortable
|-
| d || 20 || 2008-11-24 || This
|-
| b || 8 || 2004-03-01 || column
|-
| a || 6 || 1979-07-23 || cannot
|-
| c || 4.2 || 1492-12-08 || be
|-
| e || 0 || 1601-08-13 || sorted.
|}
Cell Size Formatting
You can define the size of a cell by using colspan and rowspan.
| col1 | col2 | col3 | col4 |
|---|---|---|---|
| row1 | A | C | |
| row2 | AA | BB | CC |
| row3 | AAA | BBB | CCC |
| row4 | AAAA | CCCC | |
{| class="wikitable" style="text-align: center;"
!col1
!col2
!col3
!col4
|-
!row1
| colspan="2" | A
|C
|-
!row2
|AA
|BB
|CC
|-
!row3
|AAA
| rowspan="2" | BBB
|CCC
|-
!row4
|AAAA
|CCCC
|}
Table Style
Without defining the style of your table, it will look rather barebones. Most pages on this wiki have a color theme to them so it's important to know how to do this.
Whenever you're defining the style (aka how it looks) of a table you will need to declare it using the style="" syntax.
However, what do you put inbetween those quotations marks? Well the answer isn't the same for all the style options you have with HTML. For example, if you want to make background color of the table CadetBlue you would have to do this:
{|class="wikitable" style="background-color:CadetBlue;"
|-
| Cell
| Cell
| Cell
|-
! Header Cell
| Cell
| Cell
|}
Notice how the there is a semi-colon ';' after it. You must use semicolons to separate each attribute you use and to end the string.
For more information on what attributes there are for styling go Here.
Depending on what you're trying to do, you can style different parts of a table. To style the entire table, your style will have to go directly after where you define the class of the table:
{|class="wikitable" style="text-align:justify;"
|-
| Cell
| Cell
| Cell
|-
! Header Cell
| Cell
| Cell
|}
To Style Individual Cells you will need to define the style of the cell and then use the '|' character after which you can then write the content that would go into the cell. Additionally, you can do this to header cells "!" in the sameway.
{|class="wikitable"
|-
! style="color:blue; text-weight:bold;" | This Header Cell is Styled!
| Cell
| Cell
|-
! Header Cell
| Cell
| style="text-align:left" | This Cell is also Styled!
|}
To Style Rows you will need to define the style after you declare the row with 'the |-' character
{|class="wikitable"
|-
| Cell
| Cell
| Cell
|- style="text-weight:bold;"
! Bold Header Cell
| Bold Cell
| bold Cell
|}
Using Templates
On the wiki we have a large variety of templates, all serving their own unique function and purpose to how the designer saw fit. A good comprehensive list of all of our templates can be found in the templates category where they are all sorted and dived into sub categories depending on their use. But enough about that, let's actually get down and learn how to use a template!
A template can be called on and shown on a page by entering the following syntax:
{{TEMPLATENAME}} - You can also feature the namespace and it will still work, like so: {{Template:TEMPLATENAME}}
Depending on what template is used you might find yourself having a few parameters to customize when you use the template on a page. A short list of customizable parameters can usually be found on the page of the template (If it has any)
To give a nice example we'll take Template:Needs revision and show you how to use it. To feature the template on your article or page simply add the following to the page:
{{Needs revision}} - This will cause the following to show up:
ПРИОРИТЕТ: Отсутствует
Something that instantly becomes clear is the reason and priority are undefined. To correct this simply go back to where you added the template in your page and add this:
{{Needs revision| reason = Example! | priority = Example!!}} - This will cause the following to show up on the page:
ПРИОРИТЕТ: Example!!
To explain it in simple terms all you have to do is this:
{{TEMPLATE NAME| PARAMETER NAME = DEFINE (The define can differ per template so be sure to check with other uses of the same template}}
